Wednesday, 20 March 2013

Follow-Up To +2 Band Sizing


I received so many comments on my post about adding 2 inches to your underbustmeasurement that I’ve decided to respond to them in a proper post as opposed to replying one by one. When I tallied them last night, there were 16 comments that agreed with my post, 16 comments that disagreed, and 21 comments that were neutral or somewhere in the middle.

A common thread in the neutral comments was that my +2 method will work for women in the 26-34 band size range, but that higher measurements (like 38 and up, though some people started this category at 34 or 36) often need to use +0 or size down. I think this makes sense in several ways—firstly, because more natural padding means a tighter band wouldn’t have the same discomfort problems as when it’s coming in contact with ribs. Secondly because as a band gets longer, it has exponentially more stretch. I do regret not mentioning this in my original post. I don’t know that I can take a specific viewpoint about it since it’s not my area of expertise, but it was a pretty big oversight to not mention those issues, so I’m sorry about that. Bands from 28-32 are really more what I was talking about; they often have very little stretch because a solid 2/3 of the length of the bra is the cups.  I think people in this size range will often find increased comfort if they wear +2 from their firm measurement, unless they absolutely cannot in the case of very heavy breasts. In this case they may need to wear smaller bands, but until bands are made to be more comfortable, that’s not an ideal situation—it’s something you do if you have to, not something we should all do. Again, that was really what my point was.

Another topic that came up a lot is the tightness of measuring. I never thought of myself as measuring tightly, but having shown people photos of how tightly I measure, apparently I do use a fairly tight measurement. So this is the sort of tightness I was talking about adding 2 inches to. 


I honestly believed that everyone measured like this because the tape measure falls down if it’s any looser, but I’ve learned that isn’t always the case. I believe this might clear up some of the issues of larger band sizes needing to size down too. When I mentioned compressing the body, I meant compressing skin and bone, not fat. Compressing fat isn’t painful in the same way that I am describing. The feeling of wearing a too-small bra band reminds me more of the feeling of wearing shoes that are too small for an entire day. It’s a very specific kind of pain.

I realize that I should have emphasized the fit issue over the number issue. The most important point I wanted to make was that you should only wear +0 if +2 doesn’t work, whereas lots of people on forums recently have been saying that you should only wear +2 if +0 doesn’t work. I think we should accept something different as the basic system—start with +2 and move to +0 if necessary—and move from that, as opposed to using +0 as a starting point.

For all the people saying they use +0 because their band rides up with +2, that was still allowed for in the system I laid out, in which I said you should wear the largest band that doesn’t ride up, so we are not necessarily in disagreement. I just think people whose band is secure at +2 should stick with that and not go down to +0.

So in the spirit of science, here are images of me trying every band size from 28 (+0) to 38 (+10).

+0:

The 28 band fastens. It gives a lot of support, but more support than is necessary at the expense of comfort, and it compresses my ribs. 


This reminds me of the look a lot of people seem to favor. It’s a little hard to fasten on the loosest hook, but I can also get it onto the tightest hook. The underwires are distorting a bit as the bra tries to gain more elasticity. You can see that I get a bulge at the top as well as the bottom.

Here’s another 28 band.


The hooks are pulling out—not normal. This shouldn’t happen with a good fit.

+2:

Here’s a 30 band. 


This is pretty normal-looking to me. In my opinion, this is what a bra band that fits should look like—I do get little dimples at the bottom of the band, but it doesn’t give the image of an almost corset-like compression as the 28 band does.

+4:

This is a 32-band Panache Tango. 


The band on the Tango runs pretty small in my experience, so this is actually a pretty good fit on me. As you can see, I’m starting to get a little curve of riding up in the back middle of the band, but the sides are stable. If my boobs were just a little less heavy, I would probably love to wear a size like this.
Here’s a 32-band Freya swimsuit.


It rides up a little. I wouldn’t wear it for a full day because of the slight riding up, which decreases support, but it works great for sunbathing because the little dimples from the band cutting in have diminished in this size. I’m not active when I go to the beach so I can get away with this. I still believe some people can comfortably wear a band that is 4 inches bigger than their tight measurement, but it’s probably going to be smaller-busted women who are most comfortable doing so.

+6:

This is the band size Victoria’s Secret would put me in, 34. I've modeled it with a Panache bra, though, to make sure that major brand differences don't come into play. Here’s where it starts to ride up to the point that I lose some meaningful support. (And yes, the cups are too small on this bra. It's not mine.)


A bra band in this size is way too big for me, and I think +6 will result in a band that is too big for just about everyone. A lot of larger-busted people who haven’t had their bra epiphany yet are wearing a band size that’s six inches bigger than their measurements because in an A-DD store that’s usually the only way you can get a cup size to fit. As you can see in the difference between my +6 (34 band) and +4 (32 band), going down even one band size will make a HUGE fit different to these women. 

You gotta admit though, the +6 (34-band) totally gets rid of my back bulges! But it creates waaaay too many problems in the front for that to be worth it.


+8:

I don’t have a 36 band bra anymore, so I’ve added an extender to the 34 to create a 36 band. 


As you can see, the band starts to ride up pretty absurdly at this size. My purpose in showing this level of riding up is to distinguish between what I consider a pretty decent fit in +4 (the 32-band, which is just a little big on me) and the way fit totally collapses with a band that is truly too large.

+10:

Just for kicks, I added a second extender to the 34 so it now mimics a 38 band. I probably don’t need to say much about this one as the image speaks for itself!


Sunday, 17 March 2013

Why I Believe in +2 For Band Size


What with the growing knowledge of bra fitting, and the spread of helpful forums like Bratabase, 32D, and others, I'm beginning to think we've all gone off the deep end a bit when it comes to the tightness of bra bands. Lots and lots of people are learning that bras stores like Victoria's Secret will fit you into a too-loose band by adding inches to your measurement. The protest against this takes the form of the "War on Plus Four", and there seems to be a generalized feeling that the only proper response is to use +0 instead. +0 means that to find your band size, you just measure your underbust and use that measurement in inches as your band size. I have come to strongly disagree with this method!

Meanwhile, there has been backlash to +0 as well. Most Polish bloggers and forum members disagree with it. This excellent blog post on "Reverse Letterphobia" calls it into question. Ewa Michalak's size calculators don't use +0, but British customers tend to therefore ignore that calculator. There’s been a lot of clamoring to allow for reasons that different systems could occasionally work, and people stressing that +0 is only a starting point. But I feel differently. I’m actually a big believer in +2. I believe we should measure our underbust and add 2 inches to get our band size, and frankly, I don't think that's 'just a starting point'. I think it's the system that would work best for most people. In fact, I think most of the bra fitting stores that give good fits and don’t use measuring tapes typically do give a fit that is +2, not +0. I measure 27.5 inches around. I wear a 30 band. The brilliant bra store that fitted me didn't use measuring tapes, and put me in a 30 band, which fits me very comfortably. My sister measures about the same. She wears a 30 band. My best friend is a bit smaller and wears a 30 band. None of us experience fit issues.

I spend almost a year wearing 28 backs because I became convinced that since that was what matched my measurements, it was therefore what I should wear. I felt that I needed a tight back because I experienced a lot of back pain. To my shock I later discovered, upon switching to 30 backs, that the majority of the back pain I had been experiencing was NOT because of the weight of my boobs, nor because of a too-loose band. Quite the reverse, I was experiencing pain because the very tight bands were not allowing any breathing room and I got a dull ache from being so compressed all day in a band that had absolutely no extra stretch in it.

I often see reviews on bra stores’ websites or on Bratabase where someone suggests that the back is too loose because it fastens easily on the first wear, or because they can fit their hand underneath it. Being able to fit your hand underneath your band, fasten it comfortably on the first try-on, or stretch it away from your body does NOT mean that it is necessarily too small. It just means that the band has stretch, as it well should. In fact, there are only two reasons you should try a tighter band:
1.  If the band rides up beyond the natural angle it sits at (compare to its angle to the cups when it's off you to make sure it isn't just shaped in a way that makes it appear to be riding up); or 
2. Your center gore is not tacking to your chest BUT the cups still fit when you press it to your body. 
If a band does not feel tight, that does not automatically mean that it is too loose; a band that does not feel tight is, in fact, a sign of comfort, and that is good. There is no reason you should seek out a feeling of excessive tightness. 

Another oft-quoted line in support of +0 is the concept that we don’t add inches to our pants measurements, so we shouldn’t add them to our bra measurements. True, mostly. But check out measurements on Bratabase or a similar database, or measure your own bra. A 30 band bra typically measures only about 23 inches unstretched, and stretches to about 31-33. You don’t want your bra band to be constantly stretched to the maximum—we would never expect that with any other item of clothing. Rather, you want it in a comfortable zone where your measurement lies in between the maximum stretched measurement and the unstretched measurement. That’s what the stretch is FOR. Keep in mind, too, that stores like Victoria's Secret usually add more like 6 inches to the measurement, which really is excessive. But adding 2 inches is not in the same zone of inaccuracy.

Here are some signs your band is too small: 1. The hooks are getting pulled slightly out of their stitching. This should NOT happen in a bra that fits. 2. You get a dull ache that is relieved by trying a larger band or just taking off your bra at the end of the day. 3. You get red marks and chafing and feel like all bras are uncomfortable, even well-worn ones.

Yes—these things can happen for other reasons. But for the most part, you should wear the LARGEST band you can wear without it riding up. That’s why women with smaller or lighter boobs often find that +4 works just fine for them and doesn’t ride up—they don’t have the weight pulling the bra down in front and up in back, so a looser band is far more comfortable and a tighter one is totally unnecessary.

If you ask me, band size is NOT the most important thing about a bra. It is FAR more important to find a large enough cup size. When I was wearing a 34DD previous to being fitted in a 30GG, I never had big problems with the band riding up, and when I did, it was seriously the least of my worries. My big problem was that the cups were so small. That’s why I was uncomfortable, that’s why I had to readjust throughout the day. A well-fitted band simply helps stabilize the cups, but if your cups aren’t big enough, then that’s your biggest problem. If I’d gotten refitted at a store that offered larger cup sizes but used +4, I would have been fit into a 32G, and guess what? That would have worked just fine. A 30 band is MORE supportive, but a 32 would be perfectly adequate as long as the cups were big enough. On the other hand, a 30 band bra would have NEVER improved my issues unless it was at least a GG cup. Anything smaller than that would have just presented the same old problems.

Blasphemy? Perhaps. I’ve sat on this for a long time because I don’t want to be seen as disagreeing, disrespecting, or sabotaging the full-bust community. But I feel pretty strongly about this and so I have to post it. I know I am probably going to get some flak for this post, and I know the vast majority of US/UK bloggers are going to disagree. That’s okay. Everyone is entitled to make their own fit choices. However, I do believe that there has been a bit too much of suggestions on forums that people try smaller and smaller bands even when they really don't need to. Life is way too short to wear a bra that compresses your body. Of course, it’s totally up to you if it's your body, and I know some people do like to wear really tight bands. I just don’t like to see people telling others that they need to use +0 when doing so can cause more harm than good. So I'm placing my full support in the +2 camp. Actually, I don't know if that is a camp. But if others agree, maybe we can make it into one.

Monday, 4 March 2013

Panache Andorra Plunge Review (And Plunge Bra Musings)

I've had my ups and downs with plunge bras. And by that, I mean I've had a lot of downs with plunge bras. The shape of my boobs (full on top and fairly close-set) means that I constantly display 900% more cleavage in a plunge bra than I want to show. I always strive to strike a balance in between no cleavage and a level of cleavage that makes me feel a little overexposed. This photo from Bravissimo's website of the Fabulous Fuschia bikini shows approximately the cleavage level that I personally aim for:

Lovely cleavage!

I love the fact that this bikini top allows her to show this deep cleavage without requiring her to show a lot of the center or sides of her boobs as well. But displaying this subtle shadow of cleavage when you have a lot of upper volume can be a bit tricky. I find that wearing anything with a deep v-neck can lead to a situation in which I am literally showing over half the volume of my boobs in addition to just the cleavage that I'm aiming for.

A supportive plunge bra is really the answer to everyone's hopes and dreams on this front, because theoretically such a bra would dip down enough in the middle to get that shadow of cleavage, but rise high enough to cover enough boob volume to still reign in the girls and give a feeling of support. I've tried a decent number of plunge bras. You can see my review of the Cleo Molly here, the Curvy Kate Elegance here, and the Bravissimo Thea here if you scroll down. I've also owned the Freya Deco, which looks like this on me:


I find that the Deco gives me way too much cleavage for a casual event. Even though it fits me pretty well in a 30GG (yes, I know the back band is riding up a bit), I always felt like it was most appropriate for a very high-energy party or club evening. I've long been searching for something more low-key for everyday. I'd love to be able to wear a v-neck top to class, to lunch with friends, or on a casual date and not feel that I'm making too much of an 'impression'.

The Curvy Kate Elegance was an unmitigated disaster:


 The Cleo Molly was better--okay but not perfect, but it worked much better on my best friend, so I passed it on to her.


My answer, for awhile, was the Bravissimo Thea. As you can see, it gives me a lot less cleavage than the Deco:


However, I also found that the Thea would decline in shape throughout the day. This is something I experience with Curvy Kate balconettes, too--the shape looks great in the morning, but catch a glance at yourself in the mirror around lunchtime and you'll be shocked to see a pointy, downward-facing look. The Thea just couldn't wrangle my boobs consistently unless I shortened the straps a lot, and when I did, I had the same problems I have with the Deco--too much 'push-up' effect and too much cleavage for my comfort.

So I wanted to try the Panache Andorra Plunge. Now, you may remember that I tried the Andorra "balconette" (which is actually a full cup) and was surprised by how well it worked:


The Andorra's success in the full-cup shape I dread came from the side-support panel and the stretchy top section that supported me without cutting in. Because the Plunge version of the Andorra has these same features, I was hopeful that it would have the same success. I ordered it in a 30H, hopeful that it would fit me in the same size as most Cleo bras and also the same size I tried in the Andorra full cup.

And I was really pleased with it:


As you can see, the cleavage level is moderate, but not super-high. Best of all, it gives a REALLY nice rounded shape from the side, better than the Andorra full cup, and it stays like that throughout the day:


The top section is stretchy, which is good for my shape. My upper breast area is very firm, even hard, and has a lot of volume, so I need either something that is cut very open there, or something that has enough stretch to handle my shape. The Andorra delivers the stretch. Because it's stretchy rather than very open, it would also work on those with less stubborn volume in the top. In that way, it's a bra that could work for a wide range of shapes. My one worry with this sort of stretchy material is that those with softer texture might find it does not provide enough support or stability.

I also love the back band on the Andorra Plunge. Not only does it have three hooks, unlike my beloved Cleo bras, but it also sits at a wonderful angle, lower than your typical British bra band. Because of that, it fixes the problems I detailed in this post, sitting like this:


...rather than like this:


The lower angle eliminates back bulges and is much more comfortable and supportive for me.

As for cup size, I think the Andorra Plunge runs true to most Panache and Cleo sizing. For me, I always need a 30HH in Curvy Kate and Bravissimo bras, so this 30H runs more generous than those brands with are tighter and less forgiving in the top. I would say, though, that it's a fraction smaller than Cleo bras like the Marcie, and therefore it's walking the narrow line of needing to size up as someone who is often in between a 30H and 30HH. I do need to slip a finger along the underwire a few times throughout the day to readjust on my larger (left) side, as the upper volume presses down on my minimal lower volume and causes creasing, like so:


This isn't the first bra where I've dealt with this problem. I have it in the Panache Confetti, too. Since it only happens on one side, I find it's something I can deal with to a certain extent with a bra that serves a necessary function. In this case, the Andorra Plunge is so great in terms of shape, support, and comfort for a plunge bra that I'm willing to look away from this creasing issue until such time as I can find something better. Plunges in general aren't highly compatible with my shape, so I'm not really expecting that I will find something better than this one. A great shape and the really startling comfort level of this bra make it a keeper for me. But it's definitely not taking the place of the Cleo Lucy or Panache Sienna as my 'perfect' bra.

I did, however, find that the more recent teal color ran a tiny bit smaller in the cups. For me, this miniscule size difference was enough to send it over the edge in terms of fit, and caused the teal Andorra Plunge to fit me poorly, shift throughout the day, and to not give as nice a shape as the fuschia color. So if you are on the very edge of sizes, as I am, you may find that you would rather take a larger size in the teal color of this bra. Unfortunately for me, it only goes up to an H cup, so I can't size up to a 30HH.

In general, I think the Andorra Plunge is one of Panache's triumphs, and also one of their best-kept secrets. I'm hoping it will gain popularity and get a bit more buzz as time goes on, because I think a lot of people would appreciate the nice shape and comfort given by this low-cut bra, and I don't want to see it get discontinued. However, I'm disappointed by my experience with the teal shade, as I'd hoped the Andorra Plunge could become a mainstay in my bra collection. I'm planning to try the Spice color that will be coming out in this coming Autumn/Winter collection, and I'll report back on my experience with the sizing.

Tuesday, 12 February 2013

Thoughts & Tips on Selling Bras


             We've all been there--you buy a bra, it's not the best, but you miss the return date. So you wear it occasionally, or maybe it just sits and gathers dust. Or maybe you have a ton of bras in your size and suddenly your size changes. Investing so much money into bras you can't wear can put a serious dent in your budget. The best way to deal with this is to re-sell your old unworn or unwearable bras! In the past  year or so, I've made a solid effort to sell off all the bras I don't wear often enough or don't love enough to keep. I just mailed off the last one today and now I'm full of wisdom on the process, so I thought I'd share it with my readers. Selling bras gets much easier over time, even though it can be daunting at first. You can sell through eBay, Bratabase, or forums. I spent the first 90% of my selling spree using forums to sell bras, and then recently began listing through Bratabase. In my experience, listing through Bratabase leads to much faster sales, but you can use whatever medium you are comfortable with to sell, as long as you make sure to protect yourself (which I'll discuss at the end of this post). Here are my tips for successful bra selling. 


        1. Know the market value of the bra you are aiming to sell. Check ebay and websites that have sales (Figleaves, Brastop). If you’re selling a bra that is very widely available at bargain prices, you are not going to get the original full retail price for it even if it’s new. Used bras are, of course, worth less than bras that are new with tags, but if a used bra is in great condition, you can still get a good price for it, especially if it's a hard to find model. I just sold my gently used Freya Antoinettes for $12 each. That bra is generally available new for about $20 on eBay, so that dictated my lower price. I also just sold my gently used Thea for $25. That bra isn’t available anywhere—the color was never sold online, and the yellow is being sold for £24 on Bravissimo’s website now—so I was able to fairly ask for a higher price because it’s a harder bra to find. Bras that are no longer available might get you a higher price than ones that can be found easily on eBay, but think more in terms of a mid-range price. 
              Used bras vary in value depending on their condition. Barring any damage from use, you can determine the bra's quality (how heavily used it is) from the tag. If the tag is gray or faded, frayed with loads of threads coming off, or the text is blurred and illegible, you have a heavily used bra on your hands and you should ask for a lower price ($5-$15 range). If the tag looks as clean and neat as when you bought the bra, you have a gently used bra and can ask for more ($15-$25 or possibly more for high-demand bras like Ewa Michalak). If a bra is brand new with tags, you can ask for more ($30-$45), but keep in mind that you still need to ask for less than a retailer would ask. In general, people will still prefer to buy from a trusted retailer over a random internet stranger, so you have to offer a lower price (or at least lower shipping) to convince people to buy from you.

      2. Apart from its market value, understand the value of the bra TO YOU. Think about what it is worth to you to own the bra. Would you happily part with it for $20? Would you happily part with it for $10? Do you just want to get rid of it? Does it have enough sentimental value that you’d need to get $25 or more to even consider selling? Compare the bra’s value TO YOU to the market value. If its value to you is much higher than the market value, then it’s not worth it to sell. Keep the bra—you’ll just feel disappointed by what you get for selling it. If the value to you is lower than the market value—ask the market value! Don’t sell yourself short just because you’re not attached to a bra—sell it for what it is properly worth. And don’t expect that if you put a bra on eBay with a starting bid of $0.99, that it will magically reach the exact value you want it to. I wouldn’t recommend letting people bid unless you don’t care about the price you get. I’d recommend Buy It Now or a starting bid of just under the bra’s market price.

       3. Be careful with bargaining. If you are selling on Bratabase or in a forum, you may find that people will try to bargain you down to get a lower price. To a certain extent, this is perfectly reasonably. For instance, I recently gave someone a few dollars off on a bra because that made the difference between her buying it and not buying it. I still got a good value and the buyer was very polite about it. However, sometimes people will offer you prices that are downright insulting. These people do not respect you and are just trying to take advantage of your kindness to get a price far below what the item is worth. You do NOT have any obligation to bargain with people. If you know the accurate market value of the bra and its value to you, and you are asking a fair price based on that, you are perfectly within your rights to say “Sorry, I am asking a fair price and I don’t bargain.” I once sold a basque that I had bought for $75 new for $15 because a rude buyer pressured me and I was too shy to say no. It was worth $35 lightly used and the incident still haunts me.
      
       4. Name a price—don’t just ask for offers. If you post items for sale with no asking price and just tell people to give you their best offer, then you will lose a LOT of potential buyers. I personally will NEVER make an offer on an item that doesn’t have a starting price because I don’t want to risk being rude by accidentally offering too little, and I don’t want to feel embarrassed if I get turned down; I also won’t know if I am offering much too much for what they were hoping for. Shy buyers like me won’t touch your items if you don’t name a price because we just don’t want to open that can of worms. On the other hand, people who do make offers will often make offers far below what you were hoping to get, and you will be forced to ask for more or simply turn them down. Do a little research, find out the market value of your item, and make it clear what price you would like to get. You will nearly never lose potential buyers by doing this.

        5.     Make sure you wash the item before you list it for sale. By doing this, you will be able to see the true quality of an item. Sometimes there will be marks and stains on a bra that go away with a simple wash and the condition will be much improved. Other times, marks will not go away and you will NEED to know this before listing it so you can ask for the true (in this case, lower) value.
   
       6.     Do a little basic maintenance on the bra beyond just washing it. Many bras will pick up pills from sweaters or tops they come in contact with. These can easily be trimmed off. Just gently pull the pill away from the bra and snip it off with scissors. You’ll often find these pills on the straps of Freya bras or the bands of Panache bras. Freya bras sometimes grow a bit of fluff on the lining underneath the band. This, too, can be carefully trimmed off to make the bra look nicer. If you’ve altered the bra at all, it can usually be taken out without damaging the bra. Carefully snip the stitches out and make sure there are no marks left. There is a lot you can do to improve the quality of a bra to make sure that potential buyers will find it up to par. That being said, though…

      7.     Always be honest about the condition of a bra. If there are any stains, marks, tiny holes, snags, etc, describe them in detail and photograph them. Most buyers will not be upset or put off by such issues as long as they KNOW ABOUT THEM before they commit to a purchase. 

     8. Charge for shipping, too, unless you're shipping through Bratabase. If you use Bratabase, you will just charge the buyer the cost of the bra and pay the shipping yourself. Then Bratabase will pay back your shipping up to $10 per bra if you transfer the bra to the buyer and fill out a feedback form containing the shipping amount and your Paypal address. But if you're not using Bratabase, it's a good idea to know what the shipping will be before you deal with payment so you can do it all at once. In my experience shipping from the Eastern USA, shipping a bra typically costs $3 to elsewhere in the US ($5 for multiple bras or a larger molded bra) and $7 to the UK or Europe. Canada once cost me $8.50 for two bras, and Australia is usually about $7, but sometimes up to $9 for padded/molded. So I typically charge those prices if I'm selling on a forum, because I used recycled packaging. If you need to buy new packaging, you'll need to charge about $1-$2 more. 

      So what if you sell a bra? You will now need to deal with payment and shipping. 

      Always use Paypal to protect yourself. The whole point of Paypal is that strangers on the internet can safely exchange payments without revealing their private financial information. Paypal also includes many protections for both seller and buyer. 

     Before I began selling bras, I had no idea how to use Paypal outside of eBay, but it is actually very easy. There are two options: either the seller sends the buyer an invoice, or the buyer sends the seller a payment. There are some minimal fees (usually like $0.30, at most a few dollars) for receiving payments, but keep in mind that these small fees buy you all the protections that Paypal offers. 

    To send an invoice to your buyer, find out their email address. They do NOT need to have a Paypal account for this to work--all they need is a credit card. Log into your own Paypal account and click "Request money." Enter their email address and the amount. Boom--easy. The buyer will receive an email that will tell them how to pay either through their Paypal account or with a credit/debit card.

    If they want to send a payment to you, give them the email address associated with your Paypal account (if you don't have one, make one). They will have to send this through their own Paypal account, so if the buyer doesn't have a Paypal account, you'll be better off sending them an invoice through your own account.

    Once the payment is complete, the next step is mailing off the bra. I usually send unpadded bras in one of those soft "tough sac" mailers--the same thing bras get mailed to me in. You can also use a padded envelope or a small box, but the bag-type mailers tend to weigh a little less and be cheaper. I mostly use whatever packaging I have around at home. If you're re-using packaging, make sure to gently remove or carefully cover up (by taping paper onto them) any old labels and barcodes. Make sure the address and return address are clearly legible. I think it's generally a good idea to protect the address, either by covering it fully in postal tape, or by covering it with a piece cut from a clear zip-lock bag and taping around that. The post office doesn't require that you do this, though. If you're mailing a molded bra, make sure to add some padding (tissue paper is nice, but old grocery bags work just as well as long as they are clean and dry). This will help it keep its shape and avoid any damage during mailing. 

    Once you're ready to mail the package, it's time to deal with the post office! If you're anything like me, going to the post office can be a bit of a harrowing experience until you're used to it. It helps to go in with plenty of time before they close and be prepared to potentially wait in line for a bit. 

     If you are mailing something internationally, you will have to fill out a customs form. Don't despair--it is easier than it sounds. If you're totally lost, just ask the people working there for assistance. But the customs forms are all available at the tables that you can write on before getting in line, and it speeds things up to fill them out before you get to the front of the line. For those in the US, you will need to fill out the form PS 2976--it will say "USPS Customs Declaration CN-22" or "Sender's Declaration" on the top. You'll need to fill out your own address, the address you are mailing to, and what you are mailing. Check off "merchandise" or "gift", then list the item ("lingerie" or "clothing" both work) and its value (what the seller paid you for it). There are instructions for doing this on the first page of the form. You will also want to check off the "exception" for your package being under a certain very high value, as instructed. (The form only includes two options for exceptions and you will check off the first one). You don't need to write down the item's weight--the post office will weigh it and do that for you. Then sign and date the form. When you get to the front desk, you can ask them if everything is correct if you are nervous about it. Don't over-think it--like most bureaucratic forms, the customs declaration looks a lot more complicated than it is. They will tell you if you need to add something else to it.

     What about insurance and tracking? It is up to you and your buyer to decide whether it's worth paying more for tracking. If you have tracking and/or insurance, you will be protected against both postal error and the buyer potentially claiming to have never received the package even if they did. But it can also be very expensive. I personally find that it is worth it to get tracking for an order within the US (it costs only $0.90 extra) but not so much for something you're shipping overseas. I personally trust the postal service not to lose my items, and I only ship to buyers that seem trustworthy, but I also accept that this philosophy might occasionally lead to me losing some money. For me, that's okay, but if you're not okay with that, then you should definitely only ship with insurance and tracking for peace of mind. Just let your buyer know upfront that you only ship that way so they will be prepared to pay more. 

     Well--that's all the tips I have for re-selling and mailing bras! Any questions, or tips I missed? Let me know in the comments! And many thanks to all those who have bought my bras through Bratabase in the past few weeks :)

Monday, 4 February 2013

Clarifying Breast Shape: Full-on-top VS Full-on-bottom

This post is a follow-up to my most popular post of all time, How To Figure Out The Shape of Your Boobs.  I want to clear up a few common misconceptions and provide a few more hands-on methods for determining one's own shape.

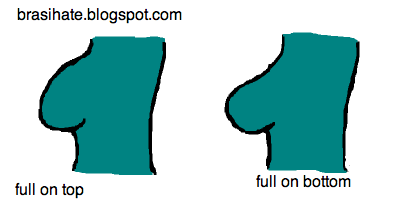
This is the image I used in my original post. It shows what full on top versus full on bottom boobs tend to look like without a bra.


However, I did not talk about breast volume/elasticity in that post, nor did I talk about nipple placement. So let's fill in the gaps.

First off, here's a helpful method to determine your own shape. Take off your bra, stand in front of a mirror, and bend over at a 90 degree angle so that the top of your back is straight. Your breast will hang down and assume its natural shape without gravity confusing things. Wherever your nipple falls is the tip or apex of your breast (even if it doesn't lie where you might think the apex would be). In this position, you will be able to tell more easily if you have more tissue above the apex/nipple (towards your head) or below the apex/nipple (towards your stomach).

Full-on-top boobs will look something like this:


Full-on-the-bottom boobs will look more like this:


Note that not everyone has one shape or the other. If you have a balanced amount of tissue on either side, then you do not have either of these shapes, but rather you have breasts that are balanced--either full all over, or less full all over.

Another confusing factor I would like to address is breast volume or "perkiness"/"sagginess", which are factors that tend to change over a woman's lifetime. Most of us have more overall volume in the breast and are more "perky" when we are young, and as we age, we lose volume and skin elasticity and become more "saggy" (which is a horrible word, hence why I'm putting it in quotes). The relative perkiness of one's breasts, or lack thereof, does NOT alter the shape you have. I've seen a lot of people confusing "full on top" with "perky, young boobs." In fact, full-on-top boobs can be either perky or not-perky, and full-on-the-bottom boobs can likewise be either perky or not-perky. Your breasts will look different as you age, but the basic shape itself will typically not change.

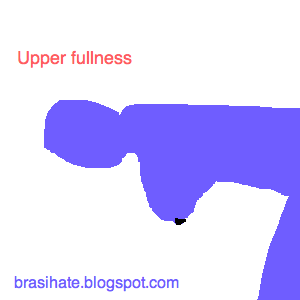
Here is what breasts with upper fullness (full on top) versus lower fullness (full on the bottom) look like after loss of elasticity has occurred.

Note that I used the same breast shape in this drawing for both breast types. It is only the nipple placement--the natural apex--that is different. And that placement of the apex will affect what sort of bras suit each breast type.

So let's revisit my original image. Here are the two types with the nipple placement I had imagined:


 BUT, if the nipple placements were changed, then these shapes would represent the opposite types. Stay with me here. Here is the original "lower fullness" image with the nipple placement changed--now it shows a shape with UPPER fullness:


The reverse also holds true. When using the original "upper fullness" image, a simple change in nipple placement alters it to depict a breast with LOWER fullness. This is why the image in my original post was really not much use to dispel confusion.


Finally, I want to clarify that these two different breast shapes do not necessarily look different when they are in a well-fitting bra. When you are wearing a bra that gives support, uplift, and shape, your boobs should be supported all over regardless of where the tissue is in relation to the apex.

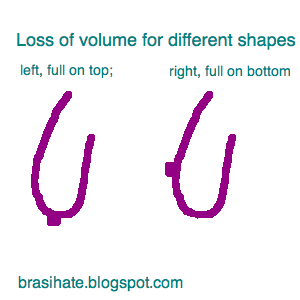
Here is what the two different types might look like in a well-fitted bra. I've chosen a round shape at random, but this will likely be the case with most shapes you can get in a bra. I've marked where the apex/nipple lies in relation to the center of the breast on the body.

Full on the bottom:


Full on top:


Again, note that I've shown these two different shapes on the same breast image--only the apex is different. However, it's also important to note that the different breast types cannot always wear the same kinds of bras. Some bras will work for both shapes, but others will not.

For example, bras that have a tight upper section (like Bravissimo's Alana and similar balconettes, or Freya's Arabella) do not work for full-on-top boobs. They will fit like this:


These bras are built for full-on-the-bottom boobs. Therefore, they have a longer arc in the bottom to the place where the apex of that breast type would fall, so breasts without lower fullness will not fill this area. Then the top section curves in too steeply to accommodate upper fullness. Sizing up will not fix these issues--it is the construction that is incompatible.

On the other hand, bras that are very loose in the top section (like the Cleo Chloe, Marcie, or Alexa) will gape on full-on-the-bottom boobs.


These bras have space to allow for a lot of upper fullness, so boobs that don't have volume there won't be able to full it. Sizing down can help, but it's not a perfect solution because then you will lose the room and space that you need at the bottom of the cup.

That's all for now, folks. I hope this has helped clear up some of the confusion regarding different breast types. It can definitely be complicated to figure out, but there are a lot of clues that can help along the way.